

While formatting Microsoft Word documents, do you format each paragraph or heading? Do you sometimes forget which formatting you used for each level of subheading? Do you have to work out why the contents table does not list all headings?
😰 😰 😰Do you insert page breaks manually to make content to fit well on the page? Do you get confused adding page numbers, headers or footers, and section breaks? Does the formatting need fixing after pasting in new content?
You are not alone. Formatting Microsoft Word documents can take a lot of time. Time that could be spent writing great content.
Below, I explain five formatting principles that will help you create Word documents that look good and consistent. They are easy to apply and do not require you to spend lots of time on formatting.
If you apply these principles, you will automatically have:
- a clean document with consistent layout for text, headings, lists, images, boxes or any other content
- page numbering on each page
- a table of contents that updates automatically
- illustrations that stay with their captions
- clear tables that wrap if needed
- a document that looks good to print at any time.
Five simple principles for formatting Microsoft Word documents
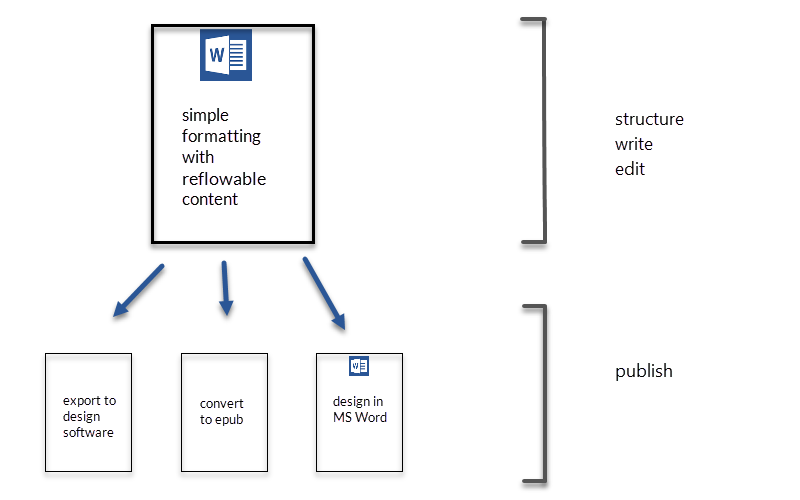
There are many reasons why good formatting habits in Word are important, but easy conversion to ebook is usually not one of the reasons cited. And yet, if you adopt the five simple formatting principles below, you will be using the reflowable content method for epub ebook conversion. This method is used to prepare a Microsoft Word document for conversion to ebook epub format and is very suitable to use during the writing and editing process.
The simple formatting principles below are based on keeping the text free-flowing or reflowable. Reflowable content is important for ebooks, as they do not have a fixed page size. It gives ebooks the capacity to be read on any device, irrespective of the size of the page. By using the reflowable content in Word, content will fit on the page at any time of the writing process. That means you can print it at any time without needing to adjust the page layout.
I have summarised the reflowable content method for formatting Microsoft Word documents in five main principles that are easy to apply, even to complex content. If you follow these principles, you can save many hours of formatting time.
Quick content links
- 1. Apply Word styles to ALL content in your document
- 2. Do not use page breaks or section breaks in the document
- 3. Add a simple centred page number to the document footer
- 4. Always insert images and other object graphics in line with text
- 5. Insert tables using the Insert ribbon and do not change the page orientation
- Your document is always print-ready
- An easy path to epub ebook conversion and publishing
1. Apply Word styles to ALL content in your document
Styles are the most important feature when formatting Microsoft Word documents and are easy to use. The fastest way to apply a style is to write a paragraph, place your cursor anywhere in the paragraph and click on the appropriate style provided on the Word Home ribbon (i.e. apply Normal style to text, Heading 1 style to your chapter or main headings, Heading 2 and following styles to subsection headings, a list style to a list element, etc.).
Most Word users will be familiar with using styles for headings, but many users do not apply styles to other content. However, Word requires that all content in your document has a style.

So, even if you do not apply a style, Word will apply the default style, Normal, to all content. By not applying your own style to your content, you are missing out on a great tool that can be used to automate your layout.
Styles are the most important tool to create reflowable content and format your document. It is therefore essential that you apply a styles to all text, bullets, quotes or other content in your document.
Advantages of using styles
The first clear advantage of applying heading styles to all your headings will be that, when you insert a table of contents, it will include all headings and subheadings. The table of contents will also update automatically whenever you make a change to any heading text.
The second advantage is that you can automate how your styled paragraphs behave in the document. The Word styles provided on the Home ribbon are basic and will get you started to apply styles for text, quotes, bullet lists, boxed text, captions or notes. Even if you do not like these styles initially, you can easily change them into a style you like.
The important message of this first principle in simple formatting is to apply a style to each paragraph in your document.
Spacing
There is another aspect to this principle. It also requires that you remove the blank lines that you have inserted in your document to create white space. These blank lines will prevent the principle of creating reflowable content from working well, and should be removed. Instead, you need to create automated white space, by defining spaces before and after paragraphs when you format your style.
In summary, the essence of the simple formatting method is that you know how to use styles in MS Word. This is not hard to learn. If you have specific questions about how to create styles, notify me in the comments below.
2. Do not use page breaks or section breaks in the document
Page breaks and section breaks in Word are used for specific layout and are not required while writing or editing your document. If you do not intend to publish the Word version of your document, but will import it into Indesign or another graphic layout program, there is no need to do a page layout with section breaks in Word. If you will publish in Word, leave the final page layout formatting until the very end, after the writing and editing phases, when your content is complete. This will allow you to export your document to epub ebook before doing the final layout formatting in Word AND will prevent you wasting time on layout during the writing process.
Section breaks and page breaks are the cause of many formatting problems, as they control all the headers and footers and will affect pagination if you are not aware of how they work.
So, how can you add breaks at the correct places in your document without using section or page breaks? You use styles. If you would like a chapter or table to start on a new page, apply a ‘start new page’ paragraph format to the heading style (e.g. Heading 1) that needs to start on a new page. This will automatically start a new page without adding a real ‘page break’ element to the document.

You can do the same for boxes, figures or tables that need to start on a new page (i.e. change the style definition of the box, table or figure name and apply a ‘start new page’ paragraph format).
3. Add a simple centred page number to the document footer
Page numbering is essential. During the pre-publication process, you will need to print the document and discuss it with collaborators. However, you do not need different page numbering for front matter and actual content, or odd and even page number locations while you are working on the document. These are complex formatting features linked to section breaks and can be difficult to fix if you are not aware of how they work.
All the document needs is a page number centred in the footer. This method of pagination is clear. It also works for double-sided printing. You can use this simple pagination throughout the writing process, the editing process, and up to the final proofing of the content. By simplifying the page numbering and removing section breaks, you will eliminate most problems involving header/footer formatting.

If you wish to have a document draft number or date in the footer, you can easily add this next to the centred page number in the footer or add it to the header.
If you require cross-references that refer the reader to other sections in the document, do not use page numbers as cross-reference, but use the Word cross-reference feature to insert an automatically updating link to the correct location in the document.
4. Always insert images and other object graphics in line with text
To add images, graphs or flow charts to your document, use copy and paste — or the Insert ribbon — to add these to your document. However, always make sure you place each image on a separate line and set the image position to ‘In Line with Text’. Do not apply any text wrapping but keep the image on its own line (i.e. paragraph). This will ensure the image does not float around in the document, disappear behind the text, or cover the text.

Then, create a style for the paragraph with the image and apply this style to all the paragraphs with images in the document. By applying a style to the image paragraph, you can easily format its horizontal placement (e.g. left, centre or right alignment). If you apply this style to all images in your document, they will automatically look consistent. These basic settings will be sufficient until the document is ready for design.
If you need to overlay text on the image or graphic, do not do this in Word, but edit the image before importing into Word. I do not recommend using text boxes to overlay text on images. This will only lead to problems. Text boxes are easily lost on the page if not inserted correctly, and they are hard to edit in track changes. In addition, the content of a text box can easily be lost when importing the document into a design program for page layout.
The simplest way to clarify or annotate an illustration during the writing process, is to use a caption or note paragraph style below the illustration. Format the style the way you like and then apply it to all captions in the document. This will present all illustrations in your document in a consistent way.
Note that images sized to display at the full with of the document page will require re-scaling if you decide later on to change the document page width.
5. Insert tables using the Insert ribbon and do not change the page orientation
Tables are most accessible when they have the same orientation as the text. If your table is too large for portrait page layout and requires landscape orientation, it is most likely complex and hard to read. To insert landscape pages, you will need to insert section breaks and increase the chance of document corruption during the pre-publication process. Therefore, I strongly recommend reorganising a table for portrait orientation, rather than trying to create a landscape page.
By reorganising your table, you will make it easier to read and scan. This, in turn, will also make your document more accessible. So, start early and organise the information in your tables to improve clarity and easy scanning.
To insert a table, use the Insert ribbon and click the Table icon to specify how many table rows and columns you will need. This inserts a simple table format.

Using styles to format the table content
To format the table, create three styles: a table header style, a table text style and a table number style. Apply paragraph formatting to these three styles so they format the table text the way you like. For example, you can apply bold font and centred alignment for the table header style; normal font and left alignment for the table text style, and normal font with centred or right alignment for the table number style. I also recommend using a basic table style. A simple table that has cells with borders shows the content clearly separated during the writing process.
If you need to use other paragraph formats in the table, always create a style for it. Try to create styles that can be used in most tables rather than special styles for just one table. There is no need to spend time on formatting of tables during the writing and editing phases. This is the time where you have to make sure table content is clear and correct. After the editing phase there will be time for a designer to apply your favourite design features.
In addition, to ensure that the table will be easy to read when it wraps to the next page, always set the header row to repeat. To make sure the table adjusts to the page width, always set the width to 100%.
If you apply these simple settings to each table in your document, all tables will look consistent.
Your document is always print-ready
If you follow these five principles for formatting Microsoft Word documents, you will have a document that is clear and consistently formatted. Paragraphs and headings and other text elements will look consistent. Tables will be easy to read and illustration text will not disappear or move in an undesirable way. The document should have very few formatting issues or problems.
This means your document will be ready to share at any time without layout fixes. You can quickly send it to a co-writer, supervisor, senior executive or editor. The layout will always be suitable for printing. Pages will not need cleaning up and will not be prone to layout corruption.
These five simple Word formatting principles ensure that you can take your document quickly through the writing and editing phases without wasting time on layout formatting.
An easy path to epub ebook conversion and publishing
When you have finished writing and editing, your document will be ready for the next step in the publication process. The content will be ready to import into design software for traditional publishing. It can also be quickly converted into epub ebook format.
If you do want to publish in Microsoft Word, now is the time to pass the document to a skilled formatter. They can quickly attach your company template to your document in Word or apply fancy design. As the text is still free-flowing, the page print size can be changed up to the last minute without much effort.
Time is important during the publication process. I hope this method will save you lots of time when producing your next document and give you more time to focus on the content. Once you have created your document styles, they can be transferred to all your documents, saving you even more time.
Do you apply a similar method when formatting Microsoft Word documents? Which method do you use?
Try out this method and let me know your experiences. If you have any formatting questions, please let me know. You can use the comments field below to submit a comment or question.
For more tips and tutorials on formatting Microsoft Word documents, sign up for the newsletter below this post.
Happy formatting!
Hashtags: #WordFormatting, #books, #ebooks, #WritersToolkit
☙ ❧
Very useful guide An. I particularly liked the section on Tables as I have from time to time had landscape oriented tables for complex information, and in thinking back, I agree that they were probably too complex for others to understand. Also, just as a large table is not going to translate well (or at all!) to an eBook, it also won’t translate well into other online material (website, blog, etc.). I have learned a lot about data presentation and data visualisation in recent years (and a lot more to learn!) and I agree that we humans do best with right-sized pieces of data.
Thanks for your comment, Sabrina.
Indeed, large tables are not easy to read in any format. However, deciding against using large tables should not mean you have to discard information. You can often reorganise the information into two (or more) smaller tables. These will be easier to format and will also be much more user friendly for the reader.